

Setup - Firestore
In this chapter, we will set up a cloud environment for the Skeet framework and Learn how to call OpenAI APIs from Firebase Functions.
As you set up your domain and obtain an SSL certificate, Please use a domain that you have already acquired, or acquire a new domain. It is assumed that you can configure the following items for the domain.
- Name Server
If you don't have permission to configure Name Server, You will need permission to configure the following items.
- A Record
- CAA Record
Using a load balancer, you will be able to call functions from the following endpoints.
https://lb.<your-domain>/skeet-fucn/root
Furthermore, by combining CloudArmor together, you will be able to set security policies for each endpoint.
Production applications require security measures such as DOSS attacks. Configure server resources and security policies for each endpoint, Let's manage server resources efficiently.
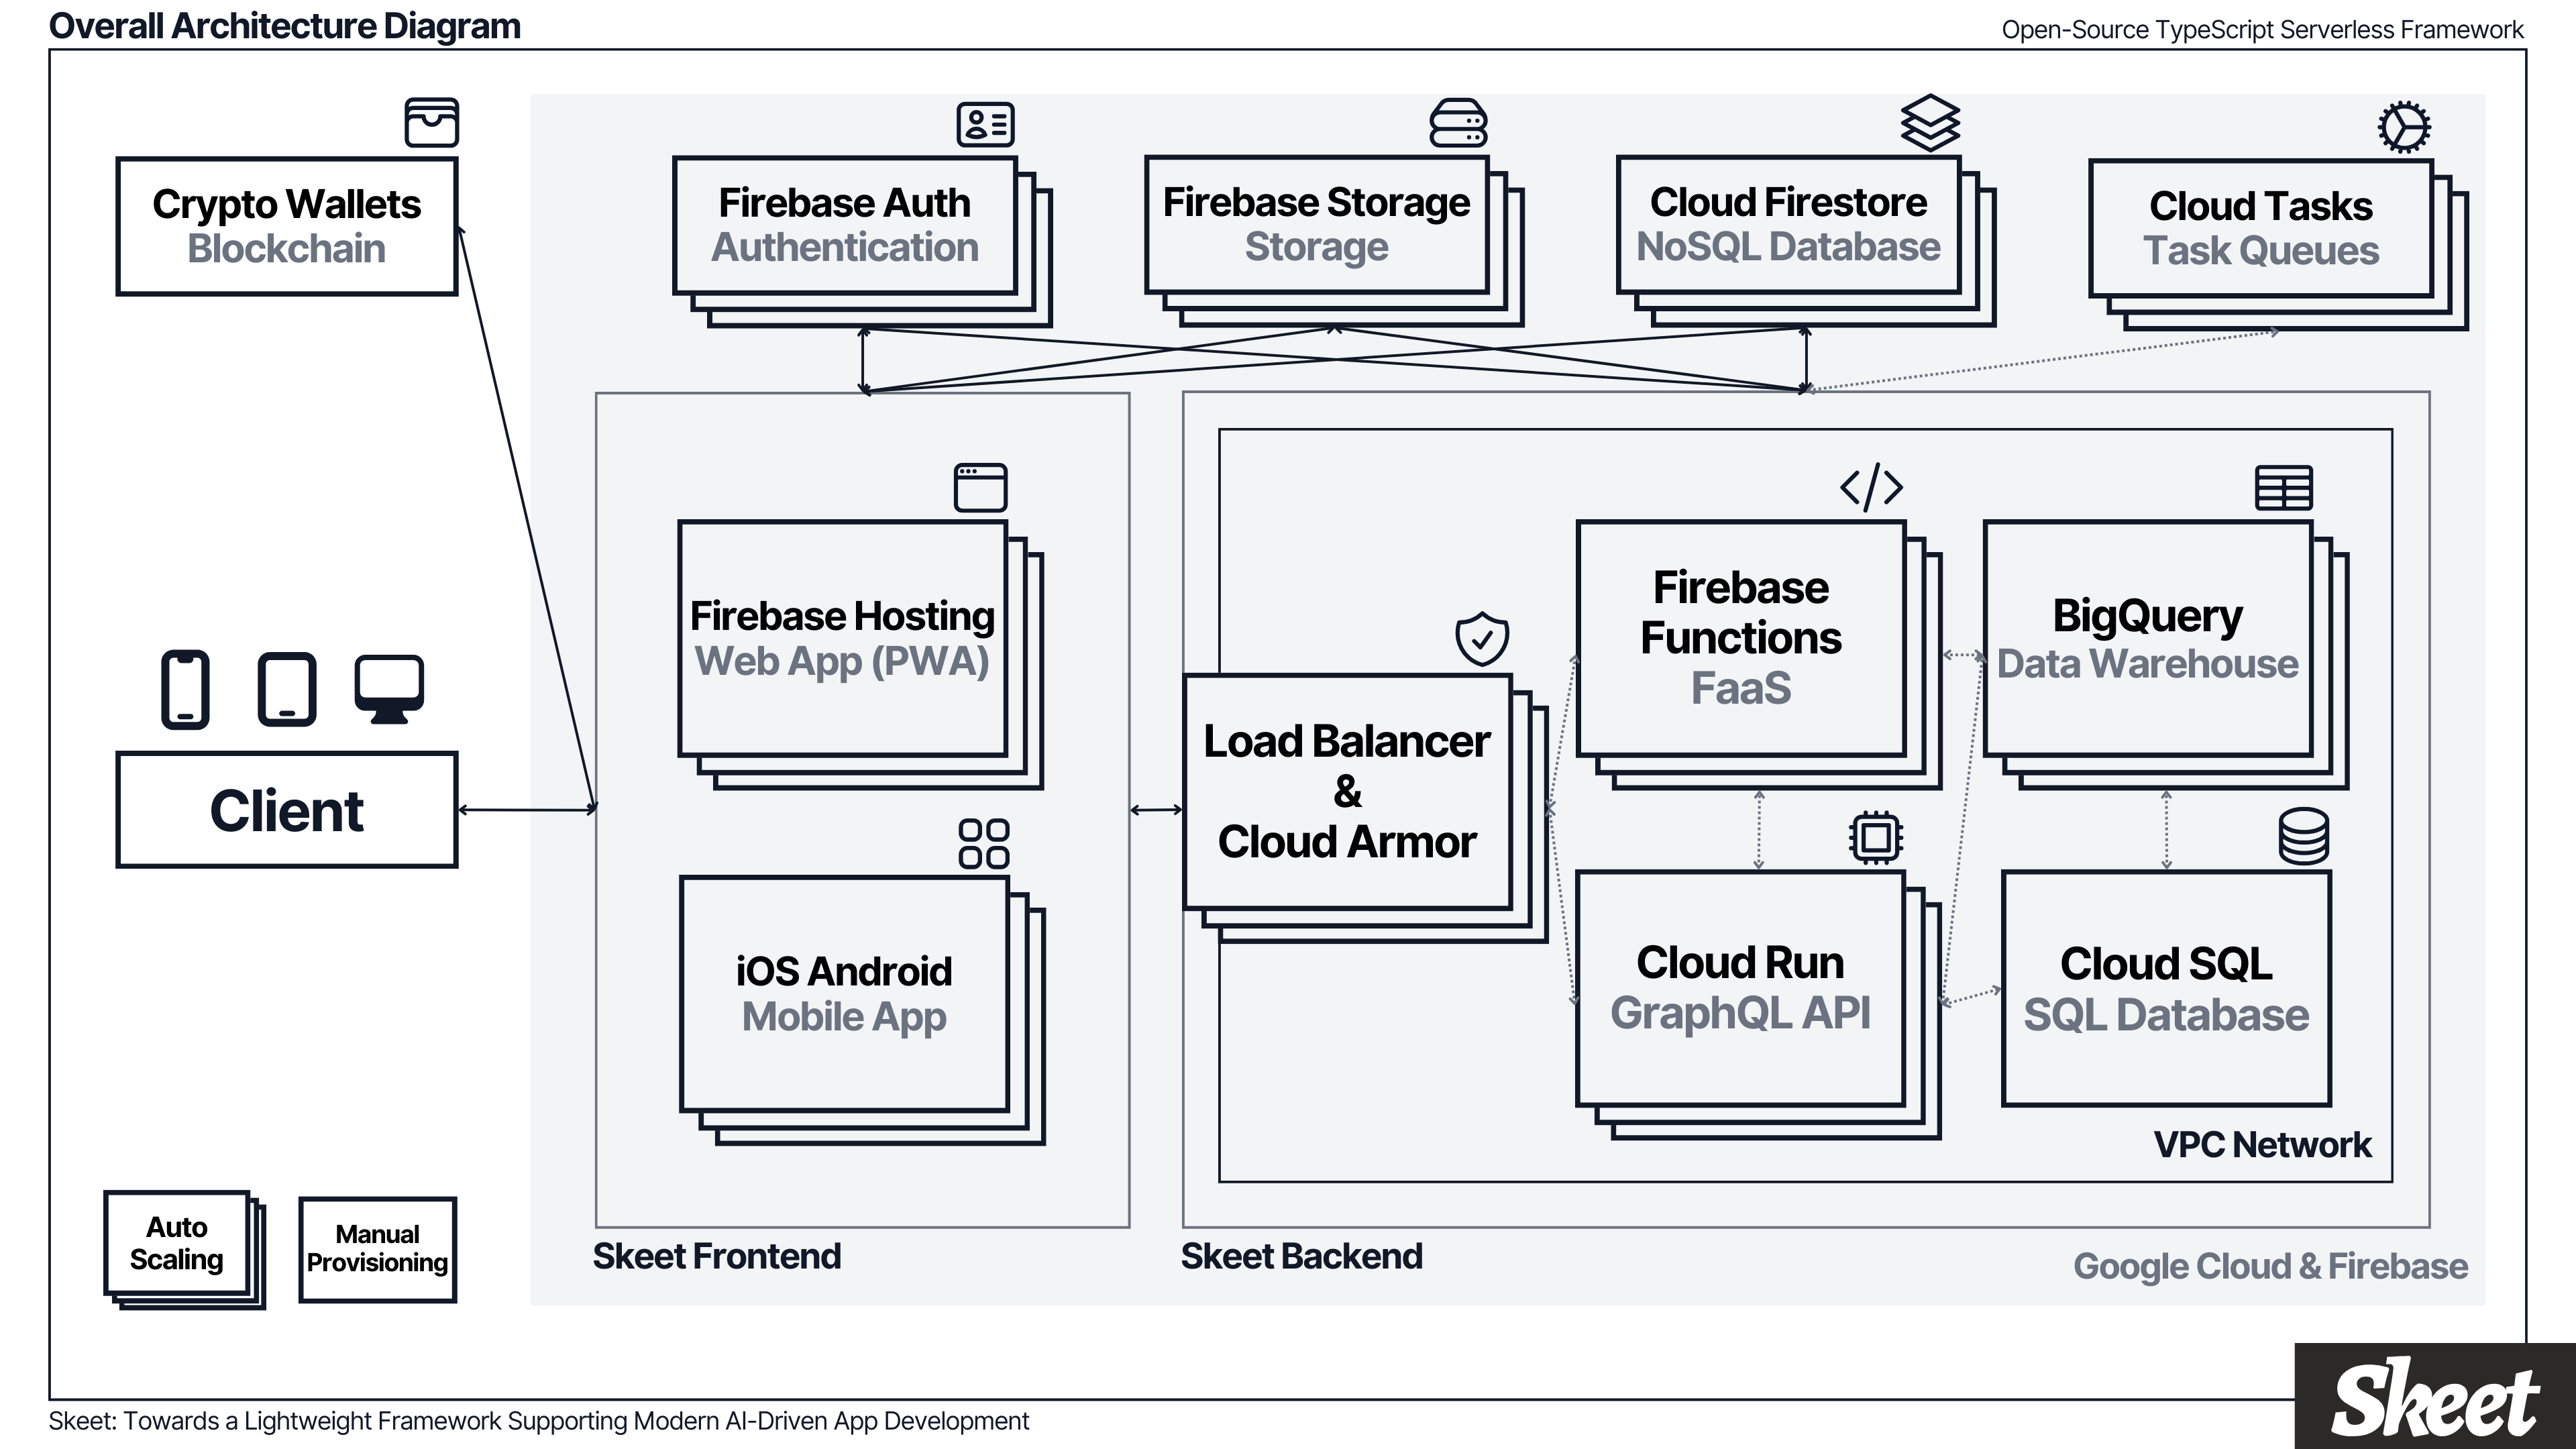
💃 What's Skeet? 🕺
⚡️ Do more, manage less ⚡️
Reduce app development and operation costs and realize more plans.
Skeet is an open-source full-stack app development solution.
You can start writing app logic immediately without worrying about infrastructure.
Here we will explain how to set up a VPN and load balancer using skeet init.
It also automatically sets security policies to protect your apps using CloudArmor.
🧪 Dependency 🧪
- TypeScript ^5.4.0
- Node.js ^20.15.1
- Pnpm ^8.0.0
- Google Cloud SDK ^471.0.0
- Firebase CLI ^12.0.0
- GitHub CLI ^2.47.0
- Java
※ We don't write Java but we need it for mobile apps working
Install Skeet CLI
Skeet CLI is a command line tool for efficiently using the Skeet framework. You can install it with the following command.
$ pnpm add -g @skeet-framework/cli $ pnpm install -g firebase-tools
If pnpm is not installed, you can install it with the following command.
$ sh -c "$(curl -sSfL https://storage.googleapis.com/skeet-assets/resources/install-v2.0.5)"
This command will install the following tools.
- pnpm
- Java
- @skeet-framework/cli
- firebase-tools
- gh (GitHub CLI)
Install Google Cloud SDK
Skeet CLI uses Google Cloud SDK to manage Google Cloud resources. Please install Google Cloud SDK with the following link.
- Google Cloud SDK ^471.0.0
Please make sure the installation is successful by running the following command.
gcloud -v Google Cloud SDK 471.0.0 alpha 2024.03.29 beta 2024.03.29 bq 2.1.3 core 2024.03.29 gcloud-crc32c 1.0.0 gsutil 5.27
Initialize CLI
To initialize the gh CLI and gcloud CLI, run the following commands.
Initialize gcloud CLI
Run the following command to initialize the gcloud CLI. This command will open a browser window to authenticate your Google account.
$ gcloud auth login Your browser has been opened to visit: https://accounts.google.com/o/oauth2/auth?response_type=xxxxxxxxx
Initialize gh CLI
Run the following command to initialize the gh CLI. This command will prompt you to select the account you want to log in to.
$ gh auth login
? What account do you want to log into?  [Use arrows to move, type to filter]
> GitHub.com
  GitHub Enterprise Server
Create Skeet Project
Run the following command to create a new Skeet project.
$ skeet new ? Enter the name of the app skeet-app 🚛 Downloading base template...📦 ⠹ _____ __ __ __________________ / ___// //_// ____/ ____/_ __/ \__ \/ ,< / __/ / __/ / / ___/ / /| |/ /___/ /___ / / /____/_/ |_/_____/_____/ /_/ 🛠️🛠️ ⚡⚡⚡ Buidl TypeScript Fullstack App Fast ⚡⚡⚡ $ cd skeet-app $ skeet init You can ask AI Assistant for help $ skeet ai --help
Oneliner Cloud Setup with $ skeet init
Up until now, in order to properly configure Cloud services, This required complex permissions and API configuration, but with Skeet Framework, The following settings are automatically performed using the Skeet init command.
- Create a Google Cloud project
- Configure Google Cloud IAM
- Deploy Firebase Functions
- Configure GitHub Actions
- Configure VPC Network
- Configure Cloud DNS
- Configure Load Balancer
- Configure Cloud Armor
$ cd skeet-app $ skeet init ? What's your GCP Project ID skeet-app ? Select Regions to deploy (Use arrow keys) 🌏 Regions 🌏 ❯ asia-east1 asia-east2 asia-northeast1 asia-northeast2 asia-northeast3 asia-south1 (Move up and down to reveal more choices)
You will be prompted interactively to select the regions you want to deploy to.
- Project ID
- region
This command creates a Firebase project and a Google Cloud project.
Upgrade to Firebase Blaze Plan
To unlock the full power of Skeet Framework, you need a Firebase Blaze plan or higher. Please visit the link provided in the console log to upgrade your plan.
⚠️ Please update your firebase plan to Blaze to fully utilize the features of Skeet Framework. To update the plan, visit the following link 👇 https://console.firebase.google.com/u/0/project/skeet420/usage/details ? Did you update your firebase plan to Blaze? Yes

From the Firebase console's bottom left menu, select Upgrade.
Once your project is created, you will be asked to confirm that you have upgraded your plan. If you press y, a browser will open and ask you to authenticate with Firebase, so click on the link to authenticate.
Visit this URL on this device to log in: https://accounts.google.com/o/oauth2/auth?client_id=xxxxxxxxxxxx Waiting for authentication... ✔ Success! Logged in as [email protected] Now using project figaro5678 ✔ Successfully Updated skeet-cloud.config.json 🎉 - Preparing the list of your Firebase apps ✔ Preparing the list of your Firebase apps App already exists. Skipping... . . . Do you want to deploy Firebase Functions now? (y/N)
Next, you'll be asked if you want to deploy your first Firebase Function. Select y to proceed.
✔ Deploy complete! Project Console: https://console.firebase.google.com/project/skeet420/overview 🚀 Deployed Your First Firebase Functions! 🔗 Your Function URL: https://europe-west3-skeet420.cloudfunctions.net/root ✔️ Updating skeet-cloud.config.json with status: FUNCTIONS_CREATED ? Do you want to create a Github Repo and Actions? Yes ? Repository Name: elsoul/skeet420
Once the deployment is complete, you will see the endpoint in the logs, You will be asked to create a GitHub repository.
To create a GitHub repository, select Yes Please enter the repository name.
A GitHub repository is created and GitHub Actions are automatically configured.
? What's your domain address for App fr.figaro.one ? What's your domain address for Domain Name Server figaro.one ? What's your subdomain address for Load Balancer backend.figaro.one
Please enter the following items to configure your domain.
- App domain example: app.figaro.one
- DNS domain example: figaro.one
- Load Balancer domain Example: backend.figaro.one
🚸 === Copy & Paste below nameServer addresses to your DNS Setting === 🚸 ns-cloud-d1.googledomains.com. ns-cloud-d2.googledomains.com. ns-cloud-d3.googledomains.com. ns-cloud-d4.googledomains.com. 👷 === https will be ready in about an hour after your DNS settings === 👷 If you are not utilizing Google DNS, it is necessary to manually configure the A and CAA records. Please set up the three records listed below: DNS Records Setup: -------------------------------- 1. A Record: Address: x.x.x.x 2. CAA Records: - 0 issue "pki.goog" - 0 issue "letsencrypt.org" ✔ You are all set 🎉 📗 Doc: https://skeet.dev
If the load balancer creation is successful Displays the name server for configuring DNS settings. When using Google DNS, go to the management screen of the domain company where you acquired the domain. Please set the record for the name server shown in the log.
If you don't use Google DNS, set up your A and CAA records manually.
-
A Record: Address: Your Load Balancer IP Address
-
CAA Records:
- 0 issue "pki.goog"
- 0 issue "letsencrypt.org"
*It will take approximately 1 hour to complete SSL authentication.
Please check if the domain is set up correctly after 1 hour.
https://<your-domain>/skeet-func/root
{ "status": "success" }
If you see the above response, the setup is complete.
Testing Firebase Functions with Firebase Shell
You can test Firebase Functions in your development environment using the skeet c command. The following command starts firebase shell.
$ skeet c > firebase
Let's call the root function that is defined by default.
firebase > root() firebase > root() Promise { <pending>, [Symbol(async_id_symbol)]: 9744, [Symbol(trigger_async_id_symbol)]: 4 } firebase > RESPONSE RECEIVED FROM FUNCTION: 200, { "status": "success" }
If you see the response {"status": "success"}, the setup is complete.
Activate Firebase Build
- Activate Firebase Authentication
-
Activate Firebase Authentication

-
Activate Email/Password Sign-in

- Activate Firebase Firestore
-
Activate Firestore

-
Select Native Mode

-
Select Region

- Firebase Storage
-
Activate Firebase Storage

-
Select Native Mode

-
Select Region

How to setup Secret Key
- Create OpenAI API Key
- Set Secret Key in Cloud Secret Manager
using the skeet add secret <secretKey> command
Set the OpenAI Organization ID as an environment variable.
$ skeet add secret ? Enter Secret Key (CHAT_GPT_ORG) ? Enter Secret Value [hidden] <yourOpenAIOrganizationID> ✅ Successfully added secret: CHAT_GPT_ORG in ./skeet-cloud.config.json ✔ Created a new secret version ../secrets/CHAT_GPT_ORG/versions/1
Set CHAT_GPT_KEY as well.
$ skeet add secret ? Enter Secret Key (CHAT_GPT_KEY) ? Enter Secret Value [hidden] <yourOpenAIKey> ✅ Successfully added secret: CHAT_GPT_KEY in ./skeet-cloud.config.json ✔ Created a new secret version ../secrets/CHAT_GPT_KEY/versions/1
To check the secret you set, run the following command.
$ skeet get secret ? Select secret keys (Press <space> to select, <a> to toggle all, <i> to invert selection, and <enter> to proceed) ❯◯ CHAT_GPT_ORG ◯ CHAT_GPT_KEY
Enter the space key to select the secret you want to check.
Use the configured secret with Firebase Functions
Set the Organization ID and API Key in functions/skeet-func/src/routings/https/root.ts as shown below.
Additionally, by default, HTTP instances are created in a public network environment; In the production environment, in order to be able to access from the load balancer in a private network environment,
Change the option used from publicHttpOption to privateHttpOption.
import { onRequest } from 'firebase-functions/v2/https' import { privateHttpOption } from '@/routings/options' import { TypedRequestBody } from '@common/types/http' import { RootParams } from '@common/types/http/rootParams' import { defineSecret } from 'firebase-functions/params' import { ChatCompletionMessageParam, defaultOpenAIConfig, openAIChat, } from '@skeet-framework/ai' const CHAT_GPT_ORG = defineSecret('CHAT_GPT_ORG') const CHAT_GPT_KEY = defineSecret('CHAT_GPT_KEY') export const root = onRequest( { ...privateHttpOption, secrets: ['CHAT_GPT_ORG', 'CHAT_GPT_KEY'] }, async (req: TypedRequestBody<RootParams>, res) => { try { const context = 'You are an assistant to cheer up people.You reply with the maximum of positive words.' const contents: ChatCompletionMessageParam[] = [ { role: 'system', content: context, }, { role: 'user', content: 'Hiiiiiiii, there! How are you doing today?\nLFGGGGGGGGGGGGGGG🚀', }, { role: 'assistant', content: 'I am doing great!LFGGGGGGGGGGGGGGG🚀\nHow are you?', }, { role: 'user', content: "What's up?", }, ] let config = defaultOpenAIConfig config.organizationKey = CHAT_GPT_ORG.value() config.apiKey = CHAT_GPT_KEY.value() config.stream = false const result = await openAIChat(contents, config) res.json({ status: 'success', result }) } catch (error) { res.status(500).json({ status: 'error', message: String(error) }) } } )
Call the root function in the skeet console to check if the Organization ID and API Key are set correctly.
$ skeet console firebase > root() RESPONSE RECEIVED FROM FUNCTION: 200, { "status": "success", "result": "Hello, Earthling! (Or whatever planet you hail from!) What's up today? Any exciting news or updates you'd like to share? I'm all ears, ready to be dazzled by your awesomeness! Let's make today spectacular! 💫" }
Success! The setup is complete.
Create OpenAI API Key
Please refer to the following link to create an OpenAI API Key.
Summary
In this chapter, we set up the cloud environment for the Skeet framework and Learned how to call OpenAI APIs from Cloud Functions.
In the next tutorial, we will introduce convenient features to advance development more practically.